![]() CARIS HPD Product Editor
CARIS HPD Product Editor
![]() CARIS HPD Source Editor
CARIS HPD Source Editor
![]() CARIS HPD Paper Chart Editor
CARIS HPD Paper Chart Editor
![]() CARIS S-57 Composer
CARIS S-57 Composer
![]() CARIS Paper Chart Composer
CARIS Paper Chart Composer
Menu | File > Open > Connection |
Tool |
|
Pop-up | Add > Connection (Projects window) |
The Open Connection command lets you open additional HPD schemas and non-Oracle databases as background data.
The command supports access to the following formats:
• Oracle (schema or single table)
• Oracle Spatial (for Spatial Fusion)
• ODBC (for Spatial Fusion)
• PostgreSQL/PostGIS
• Web Feature Services
• Bathy DataBASE (available only if the BASE Manager module is enabled)
• Tile Coverage
Connections are retained after exit and user credentials can be saved through the Credential Management option in Tools > Options.
Connections contain the settings used to connect to the data source and the display properties that will be applied when the connection is used.
Each connection is saved to a Temp folder for the current Windows user account. The location can be changed using the Connections option in the Files and Folders category in Tools > Options.
Related commands:
• | • |
Interface
Option | Description |
|---|---|
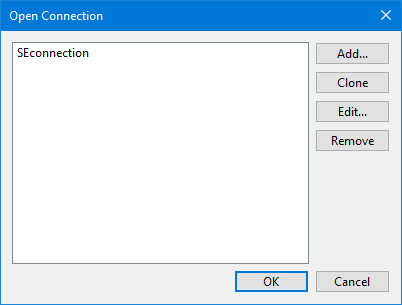
connection list | A list of all connections. |
Add | Launch the wizard used to create a new data source connection. See Open Connection Wizard for details. |
Clone | Create a copy of an existing data source connection. This is useful if you need to connect to multiple databases on the same server using the same connection settings. You can then edit the settings of the cloned connection. |
Edit | Edit the settings of an existing data source connection. This launches the Open Connection Wizard wizard with the settings defined for the active connection. |
Remove | Delete the selected connection. |
Procedure: Open
1. Select the Open Connection command.
The Open Connection dialog box is displayed.
2. Select a connection from the list.
3. Click OK.
The connection is opened and the data displayed as background data.
Procedure: Rename
1. Click on a connection in the list.
2. Click a second time on the connection name.
3. Type a new name and press <Enter>.
Procedure: Add
1. Click Add.
The Open Connection Wizard is launched.
2. Define all necessary settings for the connection.
You are returned to the Open Connection dialog box.
3. If necessary, rename the new connection.
Procedure: Clone
1. Select a connection in the list.
2. Click Clone.
A new entry is added to the list of connections. It has the same name as the selected connection plus a number.
3. Rename the cloned connection and edit it as necessary.
Procedure: Edit
1. Select a connection in the list.
2. Click Edit.
You are prompted for a password.
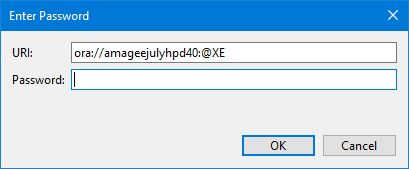
4. Type your password and click OK.
The Open Connection Wizard is displayed. It contains the values defined in the selected connection.
3. Make any necessary changes to the connection.
You are returned to the Open Connection dialog box.
Procedure: Remove
1. Select a connection in the list.
2. Click Remove.
The connection is removed.
