![]() CARIS HPD Paper Chart Editor
CARIS HPD Paper Chart Editor
![]() CARIS HPD Source Editor
CARIS HPD Source Editor
![]() CARIS Paper Chart Composer
CARIS Paper Chart Composer
Menu | Create > Text > Depth Contour Labels |
Tool |
|
Menu | Create > Text > Land Elevation Contour Labels |
Tool |
|
Add contour labels to a layer or usage.
If you select the Depth Contour Labels command, labels are added to lines that contain the VALDCO attribute.
If you select the Land Elevation Contour Labels command, labels are applied to lines that contain the ELEVAT attribute.
Related commands
• • • • • • • | • • • • • • |
Interface
Option | Description |
|---|---|
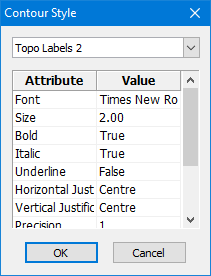
Style | The style to be used for the labels. Select from the list. |
Definition | The definition of the style. Read-only. |
Procedure
1. Select a layer that contains lines with depth or elevation.
2. Select a Create Contour Labels command.
The Contour Style dialog box is displayed.
Contour labels do not take their style from the Text toolbar but from the settings displayed here.
These settings are for display only. If you want to change the styles or create new ones, see Modify label styles.
3. Select a style from the list.
4. Click OK.
You can now set the positioning of the labels.
5. Right-click and select Contour Labels from the pop-up menu.
6. Select one of the following:
• Parallel to Contour
• Parallel to Control Line
• Perpendicular to Control Line
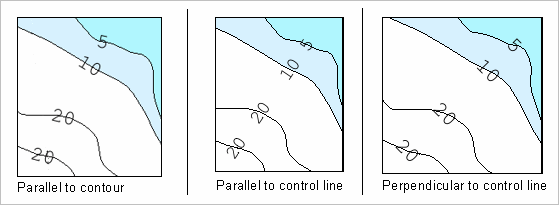
7. Position the mouse at the point where you want to start drawing the control line.
The direction in which you draw the line determines the orientation of the label. |
8. Press and hold the mouse button and drag the pointer to the second position.
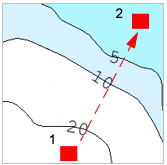
9. Release the mouse button.
The contour labels are added.
Modify label styles
Contour label styles are defined in a text file called ContourLabel.xml, located in C:\Program Files\CARIS\HPD\<version>\system\PCEConfig. You can modify existing styles and create new ones by editing this file.
The default file looks like this:
<?xml version="1.0" encoding="UTF-8"?> |
<CONTOUR_LABEL_CONFIGURATION Version="1.0"> |
<!-- Created: January 2010 --> |
<!-- Font: Name of the font to use. e.g. Times New Roman. --> |
<!-- Size: Font size in mm. --> |
<!-- Bold: Flag to indicate if the font is bold (Values: True, False) --> |
<!-- Italic: Flag to indicate if the font is italic (Values: True, False) --> |
<!-- Underline: Flag to indicate if the font is to be underlined (Values: True, False) --> |
<!-- HJust: Horizontal justification. Valid values are Left, Centre, Right. --> |
<!-- VJust: Vertical justification. Valid values are Top, Centre, Bottom, Baseline,Font Upper, Font Lower. --> |
<!-- DecimalCharacter: Decimal character to use (Values: , or .) --> |
<!-- ThousandsCharacter: Thousands separator (Values , or .) --> |
<!-- TruncateOrRound: Rounding is always Up --> |
<!-- Precision: Number of decimal digits --> |
<!-- Margin: Mask margin around label. Size in mm. NOTE: Auto-masking is not yet available. --> |
<!-- --> |
<!-- SAMPLE LABEL STYLES BELOW. --> |
<Contour Name="Contour Labels 1" Font="Arial" Size="1.20" Bold="False" Italic="False" Underline="False" HJust="Centre" VJust="Centre" Precision="0" DecimalCharacter="," TruncateOrRound="Truncate" Margin="1.00"/> |
<Contour Name="Contour Labels 2" Font="Times New Roman" Size="1.50" Bold="True" Italic="True" Underline="False" HJust="Centre" VJust="Centre" Precision="1" DecimalCharacter="." TruncateOrRound="Round" Margin="1.50"/> |
<Contour Name="Topo Labels 1" Font="Arial" Size="1.50" Bold="False" Italic="False" Underline="False" HJust="Centre" VJust="Centre" Precision="0" DecimalCharacter="," TruncateOrRound="Truncate" Margin="2.00"/> |
<Contour Name="Topo Labels 2" Font="Times New Roman" Size="2.00" Bold="True" Italic="True" Underline="False" HJust="Centre" VJust="Centre" Precision="1" DecimalCharacter="." TruncateOrRound="Round" Margin="1.50"/> |
</CONTOUR_LABEL_CONFIGURATION> |
Tags are:
Tag | Description |
|---|---|
Font | The name of the typeface. Examples: Font=”Times New Roman” Font=”Arial” |
Size | Font size in millimetres. Examples: Size=”1.20” Size=”5” |
Bold | True: The text will be bold. False: The text will not be bold. Examples: Bold=”True” Bold=”False” |
Italic | True: The text will be italic. False: The text will not be italic. Examples: Italic=”True” Italic=”False” |
Underline | True: The text will be underlined. False: The text will not be underlined. Examples: Underline=”True” Underline=”False” |
HJust | Horizontal justification in relation to the line used to place the label. Valid values are: • Left: The left side of the label is against the line. • Centre: The label is centred on the line. • Right: The right side of the label is against the line. Examples: Hjust=”Left” Hjust=”Right” |
VJust | Vertical justification in relation to the contour. Valid values are: • Top: • Centre: The label is centred vertically on the contour. • Bottom: • Baseline: The baseline of the label sits on the contour. • Font Upper: The upper part of the label touches the contour. Space built into the font may leave a slight gap. • Font Lower: The lower part of the label touches the contour. Space built into the font may leave a slight gap. |
DecimalCharacter | Decimal character. Value can be a comma or a period. Examples: DecimalCharacter=”,” DecimalCharacter=”.” |
ThousandsCharacter | Thousands separator. Value can be a comma, a period, or a space. If this tag is not present, no thousands separator will be used. Examples: ThousandsCharacter=”,” ThousandsCharacter=”.” ThousandsCharacter=” “ |
TruncateOrRound | Value can be Truncate or Round. Rounding is always up. |
Precision | The number of decimal digits. |
Margin | A mask margin around the label. Size in millimetres. |

