![]() CARIS HPD Source Editor
CARIS HPD Source Editor
![]() Project Editor
Project Editor
Menu | Projects > New Project (Source Editor) |
Menu | File > New > Project (Project Editor) |
Create a new isolated or direct project. You must have a Project Manager role to use this command.
A direct project must contain defined boundaries if created in Source Editor. Direct projects without defined boundaries can only be created in Project Editor.
Boundaries are mandatory for isolated projects.
In Source Editor, you can define project boundaries by using the cover of an open file, by digitizing a rectangle, or by typing the coordinates. In Project Editor, you must type the coordinates.
Related commands:
• • • • • • • • | • • • • • • • • |
Interface
Option | Description |
|---|---|
Properties | |
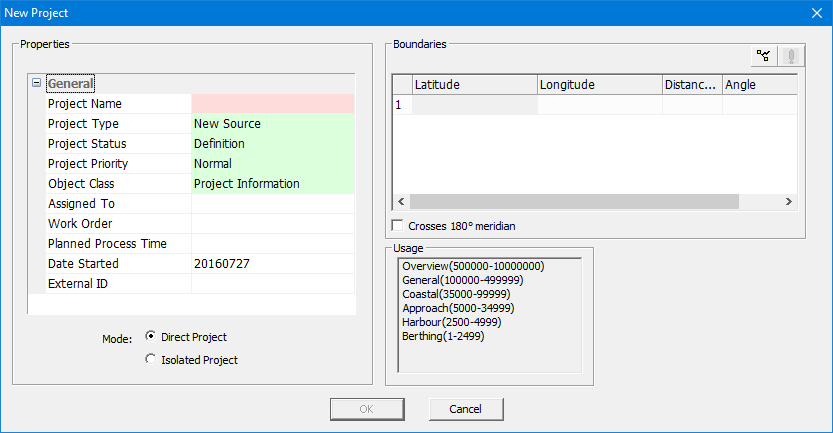
General | • Project Name: Mandatory. A name for the project. Type a name in the box. Do not use special characters such as • Project Type: Select from New Source, Usage Update, New Product, and Product Update. • Project Status: Select Definition or New. • Project Priority: Select Normal or Urgent. • Object Class: Select Project Information • Assigned to: A project can only be assigned to a user that has been created for and is associated with the database. • For a direct project, a list of available users is displayed. By default, no user is selected. You can select one or more users
• For an isolated project, a list of available users is displayed.
• Work Order: Optional. Enter any necessary work order number. • Planned Process Time: Optional. Enter a time. • Date Started: The start date for the project, in
• External ID: Optional. Enter any necessary ID. |
Mode | • Direct Project: A direct project lets users modify data from the database within a specified boundary. • Isolated Project: An isolated project lets users modify a copy of the data from a single usage and within a specified boundary. Isolated projects only work in Source Editor. |
Boundaries | |
Boundaries | The coordinates for the boundary. In Source Editor only: 1. Select one of the following commands:
In both Source Editor and Project Editor: 1. Type the Latitude and Longitude for the first corner Formats can be 2. Press <Enter>. A new row is added. 3. Repeat for each additional corner. The Distance and Angle columns are filled automatically. 4. To close the boundary, right-click and select Close Area from the pop-up menu. Other boundary commands:
|
Crosses 180º meridian | On: The project crosses the 180º meridian. Off: The project does not cross the 180º meridian. |
Usage | Associate the project with an available usage. 1. Select a usage from the list. |
Procedure: Source Editor
1. Select the New HPD Project command.
The New Project dialog box is displayed.
2. Type a Project Name.
3. Select a Mode.
4. Define the boundaries.
5. Select a usage.
6. Set any other necessary properties.
7. Click OK.
The project is created and added to the Layers window.
To view the boundaries:
1. Select the Project Boundaries layer.
2. Refresh the display.
The boundaries for the new project are displayed.
Now save the project to the database:
1. Select the Save All command.
Menu | File > Save > Save All |
Tool |
|
Key | Ctrl+Shift+S |
Further editing or updating of project attributes can be done in the Project Editor. See Database Administration for more information on the Project Editor.
Procedure: Project Editor
1. Select the New Project command.
The New Project dialog box is displayed.
2. Type a Project Name.
3. Set any other necessary properties.
4. Select a Mode.
5. Define the boundaries.
Boundaries are optional for a direct project but mandatory for an isolated project.
If you define a boundary, you must also select a usage.
6. If necessary, select a usage.
7. Click OK.
You are returned to the main Project Editor window. The project is created and displayed in the list of projects.
See Database Administration for more information on the Project Editor.
 Use Current Cover: Use the cover of the data currently displayed. in the Display window
 Digitize Boundary: Digitize a boundary as a two-point rectangle.
 View Boundary Error: Displays a message describing possible errors in coordinates.
 Reset Boundary: Remove all coordinates in the list.